Friday, December 26, 2014

Forsythia Bracelet

Forsythia Bracelet

One of my stone dealers had a series of matched pairs which were part of a new large collection of Nacozari turquoise he had cut and polished. The shapes were varied covering ovals to squares. He also had a few large single pieces. What was great about them was that since he had collected them from the same location the colors also matched well. I studied them for weeks wondering how I might use them. After much thought and time spent rummaging through photos I had saved of other artists works I came across a design I had seen about a year earlier. It was beautiful which is why I had saved the photo. It was made by an Italian artist and was one of a kind. It became the inspiration to make this bracelet. I made several changes to mine, mostly in the design of the hinges. I wanted them to be more robust and protrude less from the back side of the bracelet. The bracelet in the photo used random shaped stones. I wanted to use matched stones. 


From my dealer's collection I was able to pick a center stone along with several matched pairs, all matching in color. Nacozari turquoise comes from Sonora, Mexico. The mine is located south of the Bisbee mine in the same mountain range. Nacozari turquoise is bright blue with very little matrix. Some stones show some white highlights due to the stone's aluminum content. 


The concept of the bracelet was to have a large stone forming the centerpiece of the design. Matching pairs would flank the center stone. I chose the first ones out from the center to be the larger of the sides followed by two smaller stones. This would create a smooth visual line arcing down from the large center stone to the end of the bracelet. The two outside stones would be wide to anchor the ends of the bracelet.


This photo shows the order with the square stones inside. They are shorter than the rest and their outside ends are also rounded. This design doesn't work visually to me.


In this photo I have laid out the stones in the order in which they would fit the bracelet best. (The center stone is actually upside down.) I've also made a series of large jump rings to use as the chain and laid in a hook type of clasp. I wanted the bracelet to be adjustable in fit so a simple clasp which could connect to any link in the opposite chain was desirable.

I've cut the backing for each stone from heavy silver. To do this I traced each stone onto a large sheet of silver and then cut each one out from the sheet.


In this photo I've cut the bezel metal for each stone. The bezel is made from fine silver, needed for the softness so the metal can be closed around the stones to hold them in place. Sterling silver, being harder than fine silver is used for the balance of the bracelet.

The bezels are only rough cut. The ends of each will need to be filed perfectly square to the strip before they can be soldered into a continuous loop of metal. Then will need to be fit tight to each stone. Any looseness can not be compensated for when the stone is pressed in at the final closing. The bezel must be tight before the top edge can be folded in to secure the stone. I make my bezels slightly undersized and then stretch them just enough to fit the stone. I accomplish this by rolling the bezel between a steel mandrel and a polished steel block. All it takes is a light rolling pressure to stretch the fine silver.


Here the bezels are complete and soldered to the backs. The edges of the backs have been filed and sanded flush with the bezels. Prior to soldering the bezels on to the backs the stones are pressed in and the final form is made. The bezels must match the shape of the stone or they will never fit after they are soldered.


The back side of the mounts. At this stage I remove any scratches in the silver from handling or filing using successively finer grades of emery paper. I then polish the mounts ending with rouge. It is much easier to polish the mounts before adding the hinges. I have also stamped the center mount "Sterling" and added my maker's mark "cTp".


Making hinges.

The design of the bracelet was to be flexible, wrapping around the wrist to make a snug fit. I didn't want the bracelet to be bulky or loose. This meant that each mount would have to pivot from its neighbor. The only way to accomplish that was to hinge each mount to the next. I thought about using  jump rings ninety degrees opposed to each other. This would certainly work and be easy to construct but this method would also allow significant lateral mobility to the mounts, something I didn't want. It would be sloppy. Instead I settled on using silver tubing with wire pins as the hinge elements. This would make a hinge with plenty of motion and no lateral movement.


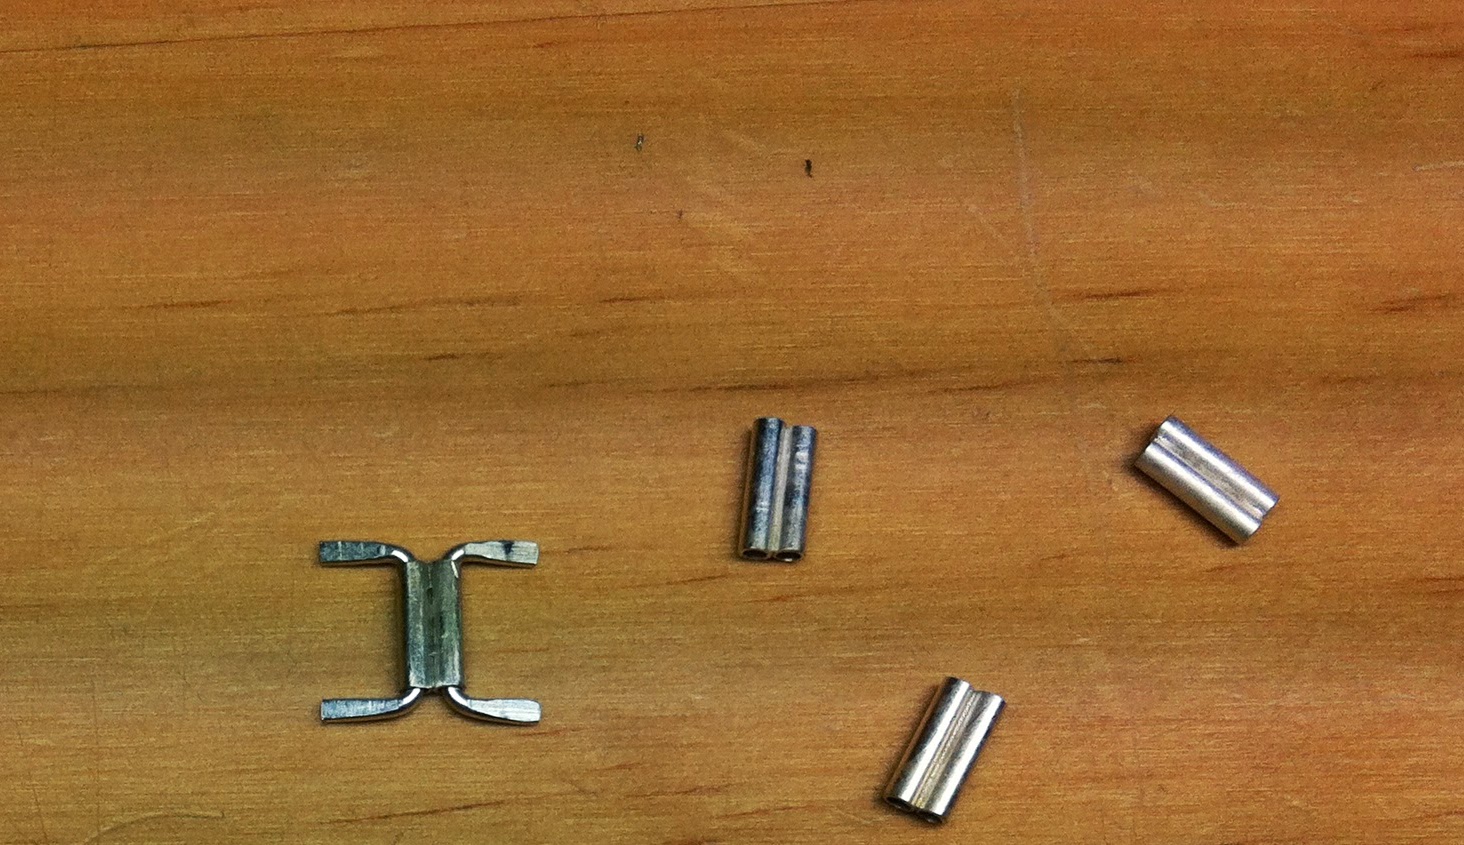
The hinges themselves are constructed out of sterling tubing, 0.071 inches outside diameter. The pins are AWG 18 wire. This fit allows easy movement. The tubes are cut 3/8 inch long and soldered side to side. The wire is then slid in and the ends are bent 90 degrees. The tubing must be supported when the wire is bent or the ends will flare. After bending the ends of the pins are hammered flat between a bench block and a square mandrel. Flat pins will add greater strength to the solder joint on the mount and will also protrude less. The ends of the hinges will be adjacent to the wearer's skin and thus must not protrude. Prior to soldering the ends must also be filed round and be smooth.


Everything needs to be polished, even the hinges. The only way to really polish the hinges is to hold them in your fingers which means your fingers get polished too.


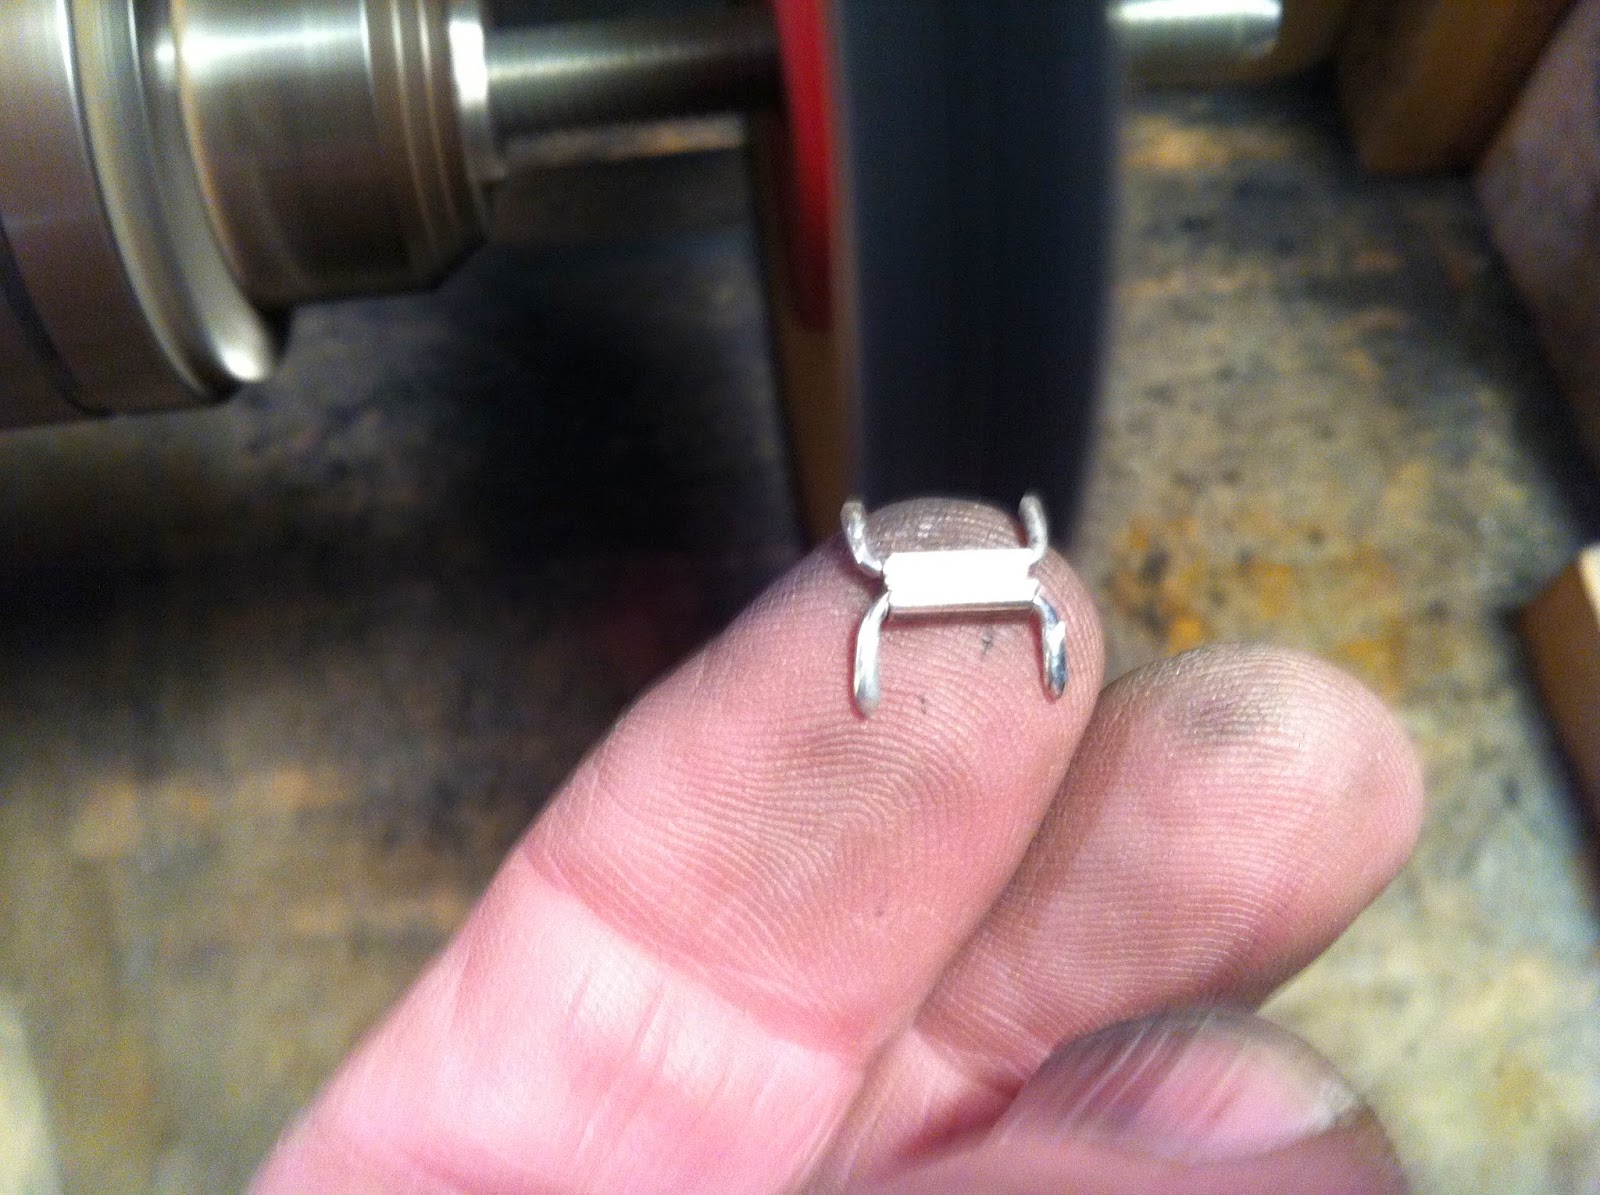
Still making hinges. The concept is starting to take shape.


The chain is finished and connected to the end mounts using half jump rings.

I wasn't sure In what order I should solder the hinges, center stone out or end stone in. Each mount would have two hinges to solder to it. It is desirable to make both solder connections at the same time;  the assembly would only have to be heated once. Soldering the hinges separately runs the risk of loosening the first hinge while the second is being soldered.

The mount itself would sit on a charcoal block. I would need to fixture the hinge body to hold it level and secure. Since the hinge pins could rotate, I would also need to press them down on to the mount in order to get a sturdy solder joint. There was no way to perform this with both hinges at once. I simply didn't have enough hands. This meant that I wouldn't be able to solder two hinges at the same time.

I ended up starting at the ends and working in. Each mount got the outside hinge soldered first creating a mount / hinge pair. I would then solder a hinge / mount pair to the previous pair and so forth. As I added a second hinge to a mount, the previous mount would act as a heat sink and fixture, securing the first hinge in the event the solder holding it flowed. I completed it by soldering the two hinges to the center mount and then soldering it to the outsides. It worked. Only one hinge was misaligned. I was able to realign it with no trouble.


A simple fixture to secure a hinge during the solder operation. The tweezers hold the hinge and act as a heat sink preventing the tubes from coming unsoldered. I worked the torch with my right hand while pressing the ends of the hinge pins down on to the mount using two solder picks held with my left hand.


The bracelet soldered together.


The finished chain. Each jump ring is soldered closed. I started with the large, making them out of AWG 16 wire. Each is soldered closed then the joint is sanded and buffed. The smaller rings are made from AWG 18 wire, also soldered closed, sanded and buffed. Two large rings are inserted into a small ring prior to it being closed. It is easy to make a chain using this method.


Each stone was numbered using a marker on the back. The orientation was also marked. Each mount had the same matching number and orientation scribed into it on the inside. I had carefully laid out the stones at the start picking a position and orientation, left/right and top/bottom to make the best looking bracelet. Numbering them was essential less one component be soldered in the wrong orientation. The bezels also have a top and bottom edge. This must be kept record of also. Soldering a bezel on upside down means the stone would only fit outside in. I always keep the stones pressed into the bezels and remove them only at my solder bench. This both maintains the unique shape of the stone in the bezel and also shows which edge of the bezel to solder to the backing plate.


I settled on a "T" clasp, made from large AWG wire with a small half loop soldered to it. The ends are dressed with fine wire wrapped and soldered in place.


The completed bracelet.


This shows how the bracelet wraps. Each mount can actually fold back to back on the adjacent mount.

The "T" clasp can pass through any of the larger chain links. It is intended that the wearer select which chain link to pass the clasp through in order to achieve the most comfortable fit. The balance of the chain can hang loose.


The bracelet wrapped inward. In each bending direction the mounts themselves will meet and thus limit the travel. The hinges do not limit the travel. They are never stressed.


The completed bracelet was a gift for a dear friend.


Friday, December 5, 2014

Some Basic Designs

Hi,

I made this post to act as an aid to the people requesting custom work from me. My designs are one of a kind, all based on the stone, its character, size, shape and color. Please review the designs and contact me at my store with any questions. My store is located at:      https://www.etsy.com/shop/Stonearches

Thank you for looking.

Charles Parham


Bezel Dressings


No dressing, the back of the ring is flush with the edge of the bezel. A very clean design.


Another view of the flush bezel.

No dressing but the back of the ring extends out past the edge of the bezel. This dresses up the bezel by emphasizing the depth of the stone.


The ring shank is half round. The thickness of the shank will be 1/2 the dimension of the width. This design adds strength to a narrow ring shank.


No dressing, the back of the ring extends out past the edge of the bezel. A classic design.


The ring shank is rectangular shaped.


A beaded dressing around the bezel. This is made from sterling bead wire. I wrap the bead wire around the finished bezel to determine the size then solder the ends of the bead wire together. It is then soldered to the ring backing. Chances are the number of beads wrapping the bezel will not equal an integer number. This is governed by the size of the stone and bead wire. I do my best to make the joint as invisible as possible by matching the pattern but it will show.


A twisted wire dressing. The twisted wire is wrapped around the bezel to determine the size then the ends are soldered together. It is then soldered to the ring backing. This pattern is more difficult to match than bead wire is at the joint. Again I do my best to match the joint but it will show.


Ring Shanks and Mounts

There are a wide variety of cross sectional shapes for a ring shank. Many of my rings are made from stock sterling wire. Typical shapes are: half round, low-dome; which is a flatter half round shape, rectangular, and semi rounded rectangular. The shank can be a single band or double.

The half round shape is the most compact size. It can be narrow while still being robust enough to support the stone and backing. It is most suitable for small stones. Half round wire is available is many AWG sizes.

Low-dome wire makes a wider band without adding thickness. It can support a larger stone. Low-dome wire is not available in as many sizes as half round.

Rectangular wire makes a strong ring shank and is available in a wide variety of widths and thicknesses.

Double wire is half round in a double pattern. It can support large long stones especially if the ends are split.


A half round band, split mounted to the back. The split mount gives good support to the back while still remaining round on a finger.


A half round band flattened at the mount to provide extra lateral support. This design contains a flat spot at the top of the finger.


A narrow rectangular, almost square band. It is flattened at the top to provide additional lateral support for the wide stone. The design leaves a flat side at the top of the ring.


A half round band plain mounted to the stone backing. This is a good design for small stone. It retains a round shape.


A wide rectangular band plain mounted to the stone backing.


A low-dome band split mounted to the ring backing.


A low-dome band split mounted.


Double half round split in both planes for extra support to the ring backing.


Wednesday, December 3, 2014

Some Finished Work

My first ring
Sterling silver with a Tibetan turquoise stone.


Some rings
Clockwise from top left: Turquoise, Pink Star Ruby, Tibetan Turquoise, Lapis, Amethyst, Sterling band, Coral, Easter Blue Turquoise.


A simple silver band
Hammered lines for texture.


Turquoise on sterling necklace


Jasper on copper
Sterling bezel, hammered copper back, findings all on a waxed cotton cord.


Hammered copper bracelets


Amethyst on sterling


Turquoise on sterling 2X


Jasper on sterling


Easter Blue Turquoise on sterling


Monday, December 1, 2014

The Art of Jewelry


About a year ago I started experimenting with jewelry making. I was inspired by a video posted by a woman showing how she made a ring out of a U.S. silver quarter. I found it fascinating watching the metal fold over into the ring all the while maintaining the stamped image of the ring. Dozens of videos later I was hooked and decided to try it for myself. This is a simple story showing some of the things I have made.

My Bench

After working for months in the basement using an ordinary workbench I decided to relocate to the upper part of the house. I did this for several reasons: A jewelers bench is specialized in many ways. Working on an ordinary bench just wasn't practical. It is also great to have natural light and not work constantly in a cave environment. I have four windows in the room which makes for a very nice environment to work in. The winter months are cold in my unheated basement so upstairs heat was a welcome addition. 

I thought about building a bench but ended up purchasing a ready-made bench. It would have cost me almost as much to build one. I purchased a simple workbench then augmented it to fit my needs. I made the hammer & mandrel holder and fastened it to the side of the bench. I also made the shelf organizer sitting on the top. The drawers are fitted to hold drills, buffs and other rotary tools. I still use the basement for soldering, chemicals, power buffing and all other dirty tasks. The arrangement is great.


Some Tools

I've always made things, being taught by my dad. He ran his own small business and out of necessity made and or repaired everything around the house. We never had a lot but got by. Out of this I learned from him and over time picked up his skills. He grew up a poor Tennessee boy living in the country and made himself into a successful businessman and father.

A few homemade hammers.

The upper one was made from a shovel handle. The lower is turned from some maple salvaged from the Middlefield property. Both handles were fashioned out of left over timber pegs from the workshop I built there. Each is faced with leather. The lower one has extra heft, being filled with lead. I use them to shape ring shanks around a mandrel. The head of middle hammer was made out of a railroad spike, the handle from an ironwood tree also salvaged in Middlefield. I haven't used it yet but designed it to texture metal.


Moving & Texturing 

Moving, shaping or just texturing metal is part of making many jewelry pieces. The simple copper bracelets I make are hammered out of a solid rod, first flattening the piece then tapering the ends and finally adding the dimpled marks to provide the finished texture. The different hammer shapes each move the metal in controlled and unique ways. Each type leaves its own distinguished mark. Round flat faces move the metal outward lightly in all directions. The ball shapes do the same but in greater amounts. The rounded chisel shapes move the metal is two opposite directions lengthening the piece. All have their working surfaces polished to a mirror finish. Without the clean finish any scratches or pits in the hammer face will transfer to the metal being worked. The brass hammer is used to strike stamps. As the metal is shaped and moved it is also 'work' hardened. Throughout the shaping process as it is hardened, I stop and use a torch to anneal the metal, softening it to allow for additional shaping. The process of hammering then annealing is repeated until the final shape is achieved. The last hammering provides the finish texture and the final hardening for the piece. 
I find the act of hammering a piece to be relaxing. The gentle rhythmic drop of the hammer is both pleasing to listen to and feel. The sound and feel each tell how the metal is responding, moving easily or resisting. Each tap nudges the piece slowly shaping it to its final form. 
All of the hammers shown here were either flea-market or auction finds. Each has its own history and story. Many were just heads in need of a handle. A few are older than I am. I love old tools, especially when I can give them new life and always wonder what they created in their past lives.  


Stakes & Posts

This is one of my places to shape and work metal. The hardware is all salvaged from a rail line. Spikes & bolts make great stakes to shape spoons or other curved surfaces. I was lucky enough to find a slice from a rail and made it into a small anvil. In order to get any use out of these the surfaces must be mirror smooth. If not any surface characteristic of the stake will be transferred to the piece being hammered. I ground them on a small belt sander using successively finer grits then polished them on a buffing wheel. I keep them oiled and polished. I use the wood posts when texturing curved sections of metal. The softness of the wood does not erase the texture on the underside of a part the way the steel stakes will. I also use the surface of the stump when hammering flat pieces.


A few Stamps

Masonry nails make excellent stamps. You can soften them in a torch, work them to the desired shape then re-harden them. Some cut nails can also be used but I find that the newer cut nails don't harden very well. The old cut nails I salvage from my antique house are hard as rocks. The spiral nail is one of hundreds I pulled from the floor in my kitchen / dining room remodel a year or so back. They harden nicely. The two on the left are used as stakes when I add makers marks to the back of small rings. After joining a bezel to the base of a mount, I place it over the stake so I can stamp it. The balance of the ring and stone are added later.


Burnishers and Bezel Pushers

A large burnisher to clean up bezels and a small one to set flush mount stones. The brass is an artifact from the original use of the steel, salvaged from a computer printer. The bezel pushers are made from bone. I like them better than metal pushers.


A Few Mandrels

You just can't have enough mandrels. I have several metal sizing ones and use them for hammering ring bodies to shape. Some are round, others have flats or groves. I make many out of hardwood for specialized uses: Bending ring bodies to shape, buffing and the like. With a wood lathe you can make one in short order. A few are shown here. The flat ones are good for bending flats onto ring bodies. I use the round ones as holders when buffing rings. It saves my fingers. They are all made from cherry or maple with the exception of the top two. Those are made from high-bush blueberry. It is a slow-growing shrub and can be found everywhere in New England. It grows wild in the woods on my property. It's not uncommon to find twenty growth rings in an inch diameter piece. It is very hard, has  extremely tight grain, turns well and finished nicely. I also use it as stakes to hammer against.


Additional mandrels for special use: 1) a large bracelet mandrel. It fits into a hole in the face of my bench securing it. 2) A small bezel mandrel used for smoothing out bezels and 3) Flat mandrels for shaping ring shanks.


Jump Rings & Bezels

A perfect bezel fits a stone tightly before the final closing. I find it difficult to cut, shape and solder bezel material into the exact size so I always make then slightly small. After soldering and sanding the joint I use a straight mandrel to 'stretch' the bezel to its exact size by rolling it against a flat steel plate. All it takes is gentle rolling pressure to stretch the fine silver. This lets me fit the bezel exactly to the stone. A very small tapered 'bezel' mandrel is handy to make some final adjustments to bezels. 
The two stepped mandrels are used to make jump rings. It's the easiest thing to do: Wrap repeated tight coils of wire around the mandrel then while securing the coil against a wood block, saw the entire coil through. The process will leave perfect jump rings nicely collected around the saw blade. You can make dozens in almost no time.


Of all the tools I purchased or made, I found that getting a good torch to solder with was the most difficult. There are excellent choices available for oxygen / propane or other gasses but generally they come at a high cost. At this time my finances don't offer the luxury of purchasing one. The standard hardware store blow torch isn't nearly precise to solder jewelry. I have found that the small micro torches sold in hardware stores work well when soldering bezels and the like. They can be purchased at a reasonable cost. I actually have two and will use both when soldering larger pieces but still found the occasional need for something precise and hotter. I did purchase an inexpensive oxy-propane torch but found the flame to be much too large. I improved it by pressing a short length of K&S brass 1/16" tubing into the torch thus reducing the size of the opening. Now the flame is only 1/4 inch in diameter. It's finicky to adjust the flame but does work pretty well. Someday maybe I'll purchase a Little Torch.